Sunday, May 29, 2011

Birds and Butterflies

At the Mueller Plant Fest in early April, we bought a purple martin house that had been donated to raise funds for the Friends of the Mueller Prairie. The three-level, 12-compartment house needed some work, but nothing that seemed too difficult.


The house has entirely too many different types of metal - aluminum roof and floor plates, galvanized steel dividers, painted galvanized exterior panels, ferrous (and very rusted) nuts and bolts, and stainless steel clips holding rebar perches. After too much thinking about galvanic reactions, I probably did not make any significant improvements. The nuts and bolts are now zinc, sacrificial compared with the other metals - though they may corrode away, at least they shouldn't damage the other metals in the process. The perches are aluminum rods.

I also learned entirely too much about how to paint galvanized metal. Almost all spray paints are alkyd (oil-based), which is incompatible with the zinc coating and paint adhesion will fail. I couldn't find a store in town carrying the latex spray paint recommended in this blog, so I brushed on an aluminum primer before spray-painting the top coat.

Finally reassembled, we put the birdhouse up in the backyard in early May, perhaps too late to attract a group of martins looking for a nesting site.


While we were not fortunate enough to have nesting birds this spring, we did host another form of developing life. Long-tailed skipper caterpillars devoured almost all of the leaves of our Texas wisteria, then made cocoons from the few that remained. We missed seeing the butterflies emerge, but here's one preparing for metamorphosis.

Tuesday, April 12, 2011

From Winter to Spring

It's been a long time since we've posted, and the weather has turned from snowy winter to beautiful spring.


Over the winter, with the help of my friend Kristen, we painted two rooms: a deep purple wall in the dining room, and a really green green in the half bath.


We also hung some new "art" in the bedroom: framed pages of a bird guide to Texas. Now the walls just need to match the pale blue background of the illustrations, and the room will finally look finished.


This spring, we've watched our plants flourish after the lengthy freeze. The peach tree blossomed and now has a few peaches growing.


Native plants purchased at the Ladybird Johnson Wildflower Center plant sale in the fall are blooming, and we added a few more from the spring sale. Giant spiderwort:


Winecup:


And lanceleaf coreopsis:


The Wildflower Center is having a photo contest through June 15th, and I plan to enter a few from my garden!

Sunday, November 21, 2010

Lessons Learned the Hard Way

Timothy and I learned two lessons the hard way this weekend. The first lesson: Listen when your builder tells you to redo the clear coat on your gorgeous new front door after a year in the house. At a year, the door still looked great, and it seemed too soon to need such extensive maintenance. After nearly three years, with harsh southern sun beating on the door every day, the clear coat had started to crack. Our real wake-up call was when a solicitor rudely taped a flier to the door, and the tape took off not just the clear coat but also spots of the stain underneath.

Saturday morning, we decided to tackle the chore. Brian, our next-door neighbor, came over with some coffee. Our first roadblock was when we realized that the middle hinge on the door had a locking pin and was screwed in with security screws. Since you have to be inside the house to remove the pins, this security measure seemed grossly misplaced. All we can assume is that the builder didn't trust the subs not to run off with a really nice door. Fortunately, Brian discovered that Home Depot sells a screwdriver head that will remove the screws, which seems to defeat the point.

Initially, the light sanding seemed to work well enough in removing the old clear coat, but when we got to the more damaged areas, the stain came with it. We quickly realized we were too late and instead needed to fully refinish the door - sand it down to bare wood, re-stain it, and apply a fresh clear coat.

When Timothy got out the orbital sander, I went off in search of the right stain. The sales associates for David Weekley were able to tell me the color, fruitwood, but not the brand. No houses are under construction currently, so there are no builders around to ask. Multiple manufacturers make a fruitwood stain. I wound up buying two different brands and hoping for the best. Zar turned out to be a closer match than Minwax.


What we'd thought would be an easy one-day project turned into our whole weekend, and we're still not done. We sanded all day yesterday, into the evening, until Brian came over with beer. Today, the door came back down for some final sanding. We dusted it off with Brian's air compressor, cleaned it with denatured alcohol, and applied two coats of stain and one coat of spar urethane. It's still drying. Our dog Laika, usually quite excited to have visitors come in the door, is apprehensive of passersby when there's no door. She's been an overly zealous guard dog.


The door should have a second coat of urethane, but we've run out of time and daylight. As soon as the four hours drying time are up, we'll rehang it and finish the project after Thanksgiving. I guess we should return all of Brian's tools in the meantime!


The second lesson learned this weekend: environmentally friendly solvent isn't much of a solvent. At Home Depot, next to the paint thinner, denatured alcohol, and other stuff that will make your head spin are a few packages that claim they won't. When your paint thinner comes in plastic, that should be a clue that it doesn't dissolve petroleum products. It's thicker than traditional paint thinner, opaque white, and a little less smelly. My confidence in it was boosted when it worked fine to clean up the stain. Not so with the urethane. It just smudged the stuff around, into places it wasn't already on the gloves and brushes. Worried I was about to ruin the sink, I sent Timothy back to the store, but they'd already closed. The gunky gloves are drying in the garage and the brushes are soaking what might as well be a jar of milk, waiting for some real solvent. We managed to save the sink and my hands with the last bit of paint thinner from the garage and a splash of acetone borrowed from, you guessed it, Brian. I don't recommend acetone on bare skin. Also, your cleaner isn't environmentally friendly if it means you use more of the tough stuff to erase your mistake in ever trying it in the first place.

Sunday, August 15, 2010

Office Chairs

In her office, my Grandma Pauline had two mid-century Danish rolling chairs, one brown and the other green. The green chair matched her green lateral filing cabinet. They have gorgeous lines, nothing like today's office furniture.

I had hoped to continue using them as is, but their foam had deteriorated to the point that sitting down created a poof of orange dust. Timothy and I started to reupholster them shortly after I moved in, though we quickly became sidetracked by buying our house.


Upon disassembly, we discovered a number of challenging aspects to the chairs' construction. The elastic fabric, stretched from a circle to cover the elongated back and seat, was glued to a plastic ring. The foam was custom cast for these chairs, the appropriate shape and contour.


After moving into the house, we picked up the project again. Unable to locate new fabric with the same characteristics, we settled for a non-stretchy black upholstery fabric. Likewise, we made do with a flat square of foam, and bought spray adhesive in lieu of the now-orange industrial glue.

The first major issue we encountered was underperformance of the adhesive. While it was adequate to secure the foam, the fabric would not stick. Discouraged, I thought I would try a drawstring slipcover instead. Before I got started, the dog, still a puppy, decided one evening to chew the foam off both chair backs, which had been sitting in the dining room of no prior interest to her for days.

We have no other office chairs. For years now, we have used antique rope-bottom chairs for both the computer desk and my sewing table. In the interest of avoiding continued discomfort, I finally picked up the project again. The drawstrings work more or less; the seat is not fully secured because the plastic prongs on the ring won't stay snapped to the black plastic support. We'll devise some solution, but in the meantime, it feels great to type this while sitting in a real office chair.


Tuesday, June 8, 2010

Side Yard, Finally Complete

Six weeks ago, while I was in Houston at my agency's annual conference and unable to object, Timothy started digging a trench in the side yard. This past weekend into Monday, we completed the project. With crushed granite, pavers, and jasmine finishing out the space, the side yard has been transformed into a pleasant area. The backyard remains a mudpit, but that's a project for cooler weather.


Paved areas provide easy access to the trash and recycling bins and our new composter, still awaiting its first batch of kitchen scraps. Since we already use the smallest, 30-gallon trash bin, we took a composting class and will receive a rebate from the City of Austin's Green 30 Challenge. Hopefully composting with our Aerobin will be as easy and maintenance-free as their marketing suggests.


During construction, a rainstorm offered compelling evidence for the need for the french drain. The area shown is the midpoint of the side yard, which had no slope from front to back. We sloped the drain line to compensate. This spot is now the site of the composter.


Beyond the air conditioner is an unused area of side yard that we hope to train the dog to use. This component of the plan will become more important when we transform the backyard into a patio.


Outside the fence, we expanded the front flowerbed, with only a strip of granite walkway for the gas meter reader. With the thought that this summer may be as brutal as last, we intend to wait until the fall to plant in this area. At that time, we will convert the front bed from spray to drip irrigation.


By the driveway, most of the area is crushed granite to facilitate wheeling the trash and recycling bins in and out. We did plant a small clump of aloe vera to soften the corner of the garage.

Friday, June 4, 2010

Ooo la la!

With Mueller homes so cozy, our clay soil has a hard time absorbing water after a storm. Soil between adjacent houses slopes toward the property line, but there isn't enough slope front to back to coax the water out. A french drain along the fence line will hold the water until the soil can absorb it, and if there is just too much water, the drain will channel it toward the front and back of the houses where it can exit.

Here is a list of items we used in our design:

  • (1) Can of white marking spray paint - $6
  • (9) 4" x 10' Rigid PVC pipe w/ 2 rows of holes on the bottom - $90
  • (2) 4" PVC Tees - $5
  • (2) 4" PVC 90º Elbows - $7
  • (4) 4" PVC 45º Elbows - $10
  • (2) 6" square grates that fit on 4"dia. drain pipe. - $7
  • (4) Small round catch basins and grates - $48
  • (1) 9" square catch basin kit with grate - $30
  • (1) 4' x 100' Roll of 30 yr. fiberglass landscape fabric (weed block) - $45
  • (1) 4' x 50' Roll of 30 yr. fiberglass landscape fabric (weed block) - $25
  • (2) Boxes of 100 landscape fabric staples - $24
  • (1) 4" x 100' drain sleeve - $20
  • (3) Cubic yards of 5/8" - 1" River Rock w/ delivery - $200
  • (2) Downspout elbows - $6

  • Total project cost: $523

    The drain is not just the pipe, but the rock too. This is a lot of work and I only want to do it once. This is why I used the more expensive landscape fabric and the rigid PVC pipe. Home Depot sells a 4" x 100' black flexible drain pipe that already has a pipe sleeve on it. It is far less expensive than this system; however, the ridges in the pipe are notorious collectors of dirt, making it prone to clogging and hard to clean out. It is also much more difficult to slope it because it conforms to the bottom of the trench. We bought our supplies from Home Depot and the river rock from Organics by Gosh, who will deliver for $100.

    Tools used:

  • Work gloves
  • Wheelbarrow
  • Drain spade
  • 16" round point shovel
  • Round point shovel
  • Square point shovel
  • Hand trowels
  • 5 lb. pick mattock
  • 2 1/2 gallon bucket
  • Level
  • Measuring tape
  • String level
  • Hammer and block of wood
  • (4) Large heavy duty tarps
  • Hacksaw
  • Scissors
  • Drill and 1/8" bit

  • We had a lot of these tools already, except the wheelbarrow and the string level which are both at Home Depot.

    Preparation and precaution

    First off, we used the white marking paint to lay out the drain. At a couple of locations, we had to jog the trench to avoid utility boxes and fence posts. We made 45º turns in our design to minimize water impedance.

    We called 811 and had the city come out, free of charge, to locate the buried utilities. Here is a link to the utilities' color chart. They had everything marked off within 48 hrs. We took pictures of the marks for future reference.


    Most utilities are buried 18” below grade; however, I found this unmarked conduit at 12” and Time Warner’s cable at only 2” below the surface. Note the new $50 splice. The sprinkler lines and rain gauge line are not located by the city; they are private property and the responsibility of the owners not to break while digging. We were lucky. They are easy to repair, but I’d rather be working on the drain then fixing sprinkler pipe.


    Lesson learned: Dig with caution.

    Digging the trench

    We dug a 12" wide x 12" deep trench from our A/C unit to the sidewalk and a second one from the A/C unit to the alleyway. Our A/C unit is too close to the fence to dig, so we divided our drain into two separate lines and just left that 3' section between them undisturbed.


    Aside from finding sprinkler pipes and cable lines, we mostly found bits of lumber from the concrete forms, framing nails, and a few bits of the old airport tarmac.

    If you plan to bury the drain, you'll want to dig 14" to 15" deep so you will have 2" to 3" of soil to cover your completed 12" deep drain. We are building up our side yard by adding 2" to 3" of decomposed granite on top of our existing soil.

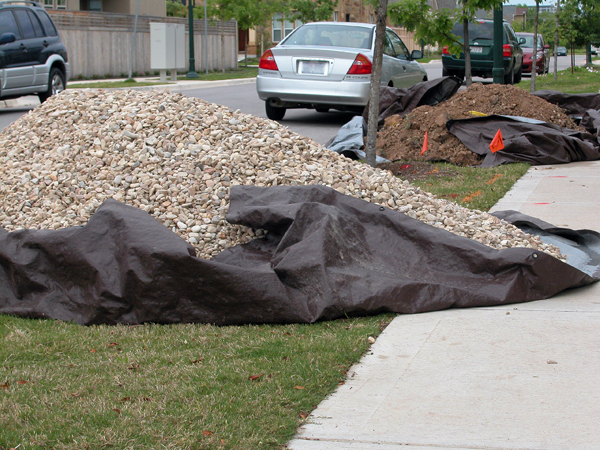
    Plan ahead what you will do with the excavated soil. We did not and ended up moving the same mound of dirt four times. If I had to do it over again, I would have dumped it directly into the back of my pick-up. We made four trips to Texas Disposal Systems where they charge $3 for a load of dirt, as compared with $35 or more per truckload of trash elsewhere.



    Inside the fence, there is limited slope from front to back, so starting from A/C unit we sloped our drain 1" for every 8'. Once we made it to the gate, the grade sloped away from the house so there was no need to dig any deeper than our minimum depth.

    Dry Wells

    At the ends of our drains we dug an additional 12" beyond the bottom of my trench creating a hole directly under our future catch basins. This provides more space especially at the ends where the water will collect the most.


    Layering

    Once the trench was finished, we lined each dry well with 4' x 4' squares from the 4' x 50' roll. We used the fabric staples to keep them open while we filled it to the bottom of the trench with river rock.

    We rolled out the 4' x 100' landscape fabric along the entire trench, over the top of the dry wells, and fit it to the bottom with fabric staples to hold it in place. The landscape fabric will minimize the dirt in the drain system.

    We poured a 3" layer of river rock and dropped in the PVC with the holes facing down. The pipes have a flare at one end so they can be fitted together using the hammer and block of wood. We could have glue them together, but being that there is no pressure in this pipe we chose just to pressure fit all the joints. Using the hacksaw we inserted our 45º elbows and tee intersections.

    We added a couple of tees and ran short pipe segments to 90º elbows that turned up to our downspouts. We didn't directly connect the downspout to the french drain, but put the 6" square grates at grade level. The grate will filter from the french drain any large debris, such as leaves and sticks. We then added an additional elbow to the downspout to direct it over the grate.

    We used the string level to adjust the slope of our pipe by adding or removing the rock until we achieved our 1" to 8' pitch, then sleeved the entire pipe with a drain sleeve. This minimizes dirt from entering the rock layer though the pipe.

    At the ends we installed catch basins. They are big enough to get a hand into so we can clean them out and run a hose into the drain. We drilled several holes into the bottom of the basin for water to drip into the dry well below. This also prevents mosquitoes from breeding.

    Once our basin was in place we poured river rock around it to secure it.

    We added an additional dry well and catch basin directly across from our water spigot.


    Finally, we burred the rest of the pipe with river rock, pulled the staples, and folded over the excess landscape fabric.

    With the hacksaw we cut the 4' x 50' roll of landscape fabric in half then rolled and stapled it over the top of the drain.

    To finish the project we are adding a 2" to 3" layer of decomposed granite and pavers sloped away from the foundation to finish off the side yard. More photos to come when the project is complete.

    Thursday, April 8, 2010

    Peachy!

    A couple of weekends ago, Timothy and I finally got around to a project we've been meaning to do since we moved into the house. We epoxy painted the garage floor. It feels so much nicer underfoot and should be easy to keep clean.


    Outside, even more flowers are blooming, including a small pink flower from my great aunt's garden. The blossoms on the peach tree have turned into baby peaches! I doubt they'll grow much, given how small the tree is, but it's still exciting.